

Subscribe For Free Updates!

We'll not spam mate! We promise.

Showing posts with label softwares. Show all posts

Monday, 18 July 2016

SSD Data Wiping: Sanitize or Secure Erase SSDs?


Media reports, Such As This  Computerworld article , Kingston Caused a lot of customers to be Concerned about Their procedures for Securely erasing all data from Their Kingston SSDs. Were like many articles based upon a  University of California San Diego study  revealed That Certain Processes That to wipe data from SSDs data whos left behind.

We will look at what the study says, and Provide You With step-by-step instructions to do a Secure Erase Which will wipe out all data from Kingston V Series G2, V100, V + G2, and V + 100 SSD.

Study: SSDs store data differently from hard disk drives
The Ability to totally erase data from storage devices is a critical component of secure data management, Regardless of Whether the organization is just throwing away an old system or repurposing it for someone else's use. Researchers from the Department of Computer Science and Engineering and one from the Center for Magnetic Recording and Research at the University of California found That Have Existing disk sanitization techniques originally used for hard drives do not work on SSDs Because the internal architecture of an SSD is very different from a that of a hard disk drive.

"Reliable SSD sanitization requires built-in, verifiable sanitize operations," the Researchers wrote.
Most modern SSDs Have That built-in commands instruct on-board firmware to run a sanitization standard protocol on the drive to remove all data. Since the manufacturer has "full knowledge" of the drive's design, These techniques Should be reliable, but Researchers found many of the implementations That Were flawed.

Sanitizing a storage device using ATA Secure Erase
Sanitizing is the removal of sensitive data from a system or storage device with the intent That the data can not be reconstructed by any Known technique. That for data residing on hard drives and solid state drives (SSD), a method Known as ATA Secure Erase is the MOST effective.

ATA Secure Erase is part of the ANSI ATA specification and When to Implemented Correctly, wipes The entire contents of a drive at the hardware level Instead of through software tools. Software tools over-write data on hard drives and SSDs, Often through multiple passes; over-writing The Problem with SSDs Is That Such software tools can not access all the storage areas on an SSD, leaving behind blocks of data in the service regions of the drive (examples: Bad Blocks, Wear-Leveling Blocks, etc.)

When an ATA Secure Erase (SE) command is issued against a SSD's built-in controller That properly supports it, the SSD controller resets all its storage cells as empty (releasing stored electrons) - just THUS restoring the SSD to factory default settings and write performance. When Implemented properly, SE will process all regions Including the protected storage service regions of the half.

Secure Erase is Recognized by the US National Institute for Standards and Technology (NIST), as an effective and secure way to meet legal requirements data sanitization attacks against up to laboratory level. Kingston SSDNow drives support the ATA Security Command for proper data sanitization and destruction.

Data sanitation regulations and organizational requirements
There are Numerous state and federal regulations That Contain Provisions related to the sanitization and disposal of data. For example, at least 10 states enacted laws Have That requires destruction of "personal information" when it is no longer needed for business.

The Health Insurance Portability and Accountability Act ("HIPAA") requires disposal at a formal documentation of procedures to Ensure health information is properly sanitized prior to Being discarded.

The Payment Card Industry Data Security Standard (PCI DSS) 9.10 That requirement stipulates storage media be destroyed when it is no longer needed for business or legal reasons. PCI-DSS is setup to verify That cardholder data on electronic media is rendered unrecoverable via a secure wipe program in Accordance With industry-accepted standards for secure deletion, or Otherwise physically destroying the media.

Additionally, many large private companies are now Requiring That data on all electronic storage media be sanitized prior to the media's sale, donation, transfer of ownership and disposal.

ATA Secure Erase tools
A DOS shareware tool called HDDErase can be used to execute a Secure Erase. HDDErase is available here.

HDDErase is an easy-to-use tool That runs from a DOS bootable drive. In order to run the system BIOS must be HDDErase Set to "IDE" or "Compatibility" mode in order for the drive to be Recognized by HDDErase. HDDErase can only be run on systems That drives are attached to a SATA or IDE ports Directly and not through a USB bridge or enclosure.

Running HDDErase
To execute a HDDErase using Secure Erase, boot from a DOS bootable drive Containing HDDErase and type hdderase, at the command prompt.
Next, HDDErase will confirm you want to run this program, select "and" to proceed. This step will be followed by additional disclaimers and a license agreement. Follow the on-screen instructions.
Next, HDDErase That will confirm all data will be "Deleted" from the selected drive. Select "and" to proceed.
 
Next, select the drive to be erased. In This example P0 Should be selected.

Next, select "1" to execute a Secure Erase.
Confirm by selecting 'c' to continue
 
When Secure Erase has finished a message will Appear That Secure Erase is complete.
Just enter N and exit.

The web site has detailed documentation on This utility.
Proper Sanitation of Kingston SSDs: Secure Erase Use Only
Secure Erase using a utility That properly implements the ATA Secure Erase command is the best way to Effectively wipe all data from a Kingston SSD.
One key benefit for IT - Secure Erasing an SSD no longer requires the 6 or more hours required for a multi-pass wipe hard drive. On a 256GB Kingston SSDNow V + 100, to Secure Erase can be completed in 2 minutes. Some SSDs can take longer, but not nearly as long as mechanical hard drives!

View the entire Kingston SSD product line

Author: Cameron Crandall - Kingston Technology

Thursday, 16 April 2015

How to free up space on Solid State Drive even for GTA V PC

Grand Theft Auto V is finally here for PCs, and it’s hands-down the definitive version of the game, from its glorious 4K resolution support to its native video editor and graphics options galore. (You can even adjust the grass quality and soft shadow technology options!)
But all those features and enhanced graphics come at a price: Sheer size. GTA V is a whopping 60-plus gigabytes. It's a monster. I simply didn’t have room available on my solid-state drive when I initially tried installing it, and it would’ve been a tight fit even after deleting some of the older games I’m done playing. Given the way GTA’s world loads, I definitely didn’t want to slap the game on my spinning hard drive.

Solution

So, what did I do ultimately? I found and used a little nifty software called WinDirStat.
WinDirStat is a free tool—donations accepted!—that scans your drive, then explains where all your storage is being consumed with some gorgeous data visualization, separating the culprits into different blocks to provide a quick, at-a-glance summary. Clicking on one of the blocks lets you dive deeper and truly see where your storage is tied up—but in this case, I was looking for major offenders anyway.
After waiting a minute for the scan to complete, WinDirStat quickly pointed out gargantuan files that I'd stashed away long ago in an obscure part of my SSD and since forgotten. System images for abandoned virtual machines. Music and video files better suited for my larger, slower hard drive. Large games I’d installed via Origin and uPlay, and thus overlooked when I cleaned out my installed games in Steam.
Within minutes I’d cleared over 100GB of files off my SSD, all thanks to WinDirStat's guidance. And now I’m free to spend my evening trawling the streets of Los Santos in all its sweet, PC-optimized glory.
If this didn't help you much or you want to save some more space just for future use then do read one of my old guides.

Sunday, 1 March 2015

How to remove Superfish from your Lenovo Desktop or Laptop

In mid February of 2015 the news broke out that Lenovo, a global leader in notebook manufacturer, had mistakenly shipped all its desktops and laptops between the months of September and December with an ad-ware called Superfish. Well, if that's not troubling enough then hear what it does.
Superfish uses a man-in-the-middle certificate to insert ads into Web browsers. But it also opens the door to third-party access of a user's browser data, according to security researchers. Which means all your passwords be it a social site account password or a shopping site's credit card password all are at risk!
Now Lenovo is has ceased the installation of Superfish in all its products but for those who purchased a Lenovo laptop or desktop in this period or have purchased one recently it's a worthy protocol that you inspect and clean tour machine for any traces of this as-ware as it is "non-detectable" by any anti-virus!
Note: Lenovo released an automated tool that will remove the software and certificate. You can find that here. Manual uninstall instructions are below.

Still for those who don't have a net connection to download the tool, mainly in rural areas where the internet connectivity is very thin, I'm giving the manual steps below. Just follw them and you'll be all good.

Removing Superfish ad-ware

1. Open "search" in Windows 8.1

2. Without the quotations type "remove programs" and select Add or remove programs.

3. Now in the list of all the programs that appear search for the name "Superfish Inc. Visual Discovery" if it is not there then you don't have the program on your system and you can skip the next step and jump to the next section of this article.

4. If you see this program then it is there, simple select Uninstall and you'll get rid of the Superfish ad-ware.

Removing the Superfish Certificates

According to Lenovo, the certificate might still exist even if you delete the application, so you need to delete both manually.
1. Again open "search" on Windows 8.1
2. Search for "Certificate" and select "Manage computer certificates."


3. The pop that appears will have options of Yes and No, simply select Yes.
4. Another window will appear. On the left, look for "Trusted Root Certificate Authorities." Click that and then select the "Certificates" sub-folder. In the list that appears on the right, find "Superfish, Inc." (If it's not there, you don't have the Superfish certificate installed.)

5. Right-Click and select delete on the Superfish Inc. directory and confirm the delete.

6. Restart your PC 

There, you are all done and good to go.

Wednesday, 14 January 2015

How to Clone a Hard Disk Drive (HDD) or Solid State Drive (SSD)

So you've just got yourself a shiny new SSD to replace your HDD as storage for your OS for fater booting aswell as faster execution of any application. Or you might have well got a new HDD/SSD to replace your old dusty storage drive.
But the big problem is of reinstalling the whole Windows and all the applications including your work softwares to your big game setups that resided peacefully in your by  default "C:" partition. Its obviously very tedious to do all that again but wait I'm here to solve this problem and save your precious time so that you can simply plug and play your new hardware.

The easiest solution to this is to Clone your primary hard disk and that also your system partition onto your new drive before starting to use it. Cloning copies the complete contents of one drive—the files, the partition tables and the master boot record—to another: a simple, direct duplicate. Imaging copies all of that to a single, very large file on another drive. Simply speaking your computer will feel as if its the same old drive even tough its the new and faster drive that you just bought.
For cloning we need to have a third party software to aid us in this process, there are plenty of them out there and most of them are free and most reliable as-well. Today I'll use Macrium Reflect as its compatible with all the brand's drive regardless of the company or type.
Note: Before you attempt to clone your hard drive or SSD, we highly recommend backing up all your data first. In addition, make sure the drive you are cloning to has enough storage space to take all the cloned data. For instance, you wouldn't want to try and clone a 2TB HDD on to a 256GB SSD now would you?


Step1: Plug it in

Before we do anything you need to plug your new HDD or SSD into your PC either via the USB port if you have the adapter and cable or you can connect it simply as a slave disk along with your existing drive through the SATA connector. 

Now boot up your system and proceed to the next step.

Step2: Download and install Macrium Reflect

Macrium Reflect is available here
Download and install the software on your system.


Step3: Important and Sensitive

Open up the software and click on Clone this disk…after this you'll see the option of choosing the source drive and the destination drive, the source drive is the drive that you want to clone preferably the windows partition and the destination drive will be your new drive that you plugged in. Make sure that you choose both the drives correctly and cross check it once selected as you might end up copying the wrong partition or in worst case a blank drive onto the system partition!
Once you have double checked that you have selected the correct destination disk, click “Copy selected partitions.” Macrium will ask if you wish to perform a “forensic” or “intelligent” sector copy. “Forensic” will copy every single bit on the hard disk, regardless of whether or not it’s actually in a used sector. “Intelligent” will only copy the disk sectors actually in use. We recommend you select the intelligent sector copy and tick “Verify File System.”

Click OK and you'll see the drive being cloned and that's it. It will take time depending on how much data you are cloning, ranging from minutes to  hours. So go around and make yourself a cup of coffee in the mean time.

Step4: Finishing touches

When you’re done, there’s one thing you’ll likely notice immediately: the partition copied in a 1-to-1 ratio to the new disk which means if you’re upgrading from a 120GB SSD to a 512GB SSD there will be a whole lot of unused space. Don’t worry, we can fix that easily enough. Simply click on the “Cloned Partition Properties” beneath your freshly cloned disk.

There you can click the “Maximum Size” button to automatically resize the existing partition to utilize the full amount of available disk space.

Much better! We didn’t spend all that money upgrading to a nice spacious SSD to leave the partition unexpanded. At this point, with your disk cloned and your partition expanded, it’s time to test out the new drive.

Step5: Reboot

After the cloning process is over just restart your PC and press F8 on your BIOS screen to enter the boot menu and change the boot priority to the new HDD or SSD that you've just cloned all your data to. This will make it your primary drive for booting up and make the old storage as a slave drive.
Now when the Windows boot up simply you can go to My Computer and see that all your files are copied and working from the new storage, now you are free to format the old partition on your old disk and free up that space.


Well that was all I guess you got your data cloned and your system running at a much faster pace than before and yes you definitely saved up a lot of time and hassle.
If you have any query regarding the same or want to add something to the article feel free to drop a comment.


Friday, 19 December 2014

AMD Omega Drivers: Review and Verdict

AMD's new Catalyst Omega drivers have been released, and this may be the single-biggest driver update we've ever seen in the new 'One big Driver per Year' strategy by AMD. There are performance optimizations for a range of AMD's cards, but more importantly, AMD has added a heap of features, like downsampling support and FreeSync. This is a big deal for AMD, which has been lagging behind Nvidia's GeForce Experience Software, especially since the release of the GTX 970 and 980.
 The best performance improvements come for AMD's top-end graphics cards, the R9 295X2, 290X, 290, and 285. GPU optimization has let AMD crank 10-20% more performance out of these cards across a swath of popular games. So if you own of of these then you are sitting on a potential gold mine yet to be dug.

A new feature for the R9 cards, Virtual Super Resolution (VSR), is similar to Dynamic Super Resolution (DSR) found on Nvidia's Maxwell cards. Don't get blown away by these big names they, basically it renders a game at a higher resolution (up to 4K) then displays it at a lower resolution (typically the monitor's native, like 1080p), making for smoother textures and edges and simulating super sampling anti-aliasing (SSAA) for games that don't support it. Unfortunately, VSR's resolution is limited to 3200x1800 on several cards, though it can go up to 3840x2160 on the R9 285.

The drivers also enable AMD's open-source FreeSync technology, which will reduce stuttering and tearing in games running at less than 60 FPS when using a compatible monitor—the first of which should be hitting the market in early 2015.

Even for older AMD Radeon cards, the Catalyst Omega drivers provide a slew of bug fixes and performance tweaks. For AMD systems running dual graphics (using an AMD APU and GPU in conjunction) or CrossFire (dual-GPU) setups, frame pacing has been an issue, which causes games to feel choppy or sluggish—despite a high framerate—when the frames are not delivered at a regular interval. The Catalyst Omega greatly improves this issue, offering as much as a 29% performance increase.
AMD APUs—which combine an AMD CPU with Radeon graphics on the same chip—see the biggest benefit here. Per AMD’s supplied statistics, several titles see frame rate increases in the double-digit percentages compared to the launch-day Catalyst 14.2 driver. (I don’t have an APU system on hand to test myself.)
You may also see some frame rate boosts when you’re using discrete Radeon graphics cards, but even AMD’s supplied stats (which compare Catalyst Omega against the older Catalyst 13.12 driver) show modest improvements.

Those are only the key consumer features included in Catalyst Omega. The full list of new goodies is too long to list in full, but here are a few more highlights:

  •     The hair-enhancing TressFX 3.0 adds support for animal fur.
  •     AMD’s Gaming Evolved client now includes Mantle support for game streaming
  •     OpenCL 2.0 and OpenGL ES3.0 are now supported
  •     AMD CodeXL 1.6 and HSA Runtime support for developers
  •     Catalyst packages for the Red Hat and Ubuntu Linux distros
  •     Streamlined Catalyst installation and faster hardware detection


Legitreviews and other credible sources point out that AMD's frame pacing improvements are for "15 popular game titles," including Batman: Arkham Origins, Tomb Raider, and the Metro series.

Nvidia's still beating AMD in the hardware game, but this is a much-needed driver update to bring AMD's software closer to Nvidia's and giving a new leash on life to the existing and older range of AMD cards.
Also when the new upcoming R9 300 series GPU start showing up by early 2015 they'll have a very strong software base to capitalize upon. In the end all I can say is that the whole AMD vs Nvidia graphic card war just got a bit more hotter giving the consumers a wider and more flexible base to choose and select from.
Download the new Omega Drivers here

Sunday, 7 December 2014

How to uninstall programs that won't uninstall

Every now and then we come across a software that we managed to install easily but are not able to uninstall now due to one reason or the other. Either the program is always running or has missing un-installation dictionaries mostly after a virus is removed by an anti virus etc. This becomes a very grave problem if the software is very big occupying ridiculously large disk space!
Sio today I'll share with you two simple methods to help you out of this mess and clean out some disk space and unclutter your desktop with unwanted shortcuts.

There are basically two methods:

1. Manual method to Uninstall
2. Automatic via a free Software

The Manual Method

In manually you will remove that program by finding and delete that software directory yourself. To manually uninstall that program, just repeat these steps what I'll show you below.

Step 1: 
Open the “Programs and Features” from control panel and find that program what you wants to uninstall.
Step 2:
Now, select that program and click uninstall and follow the procedure whatever that software shows you to uninstall itself. If you've managed to successfully remove that program then you don’t need to read on, but if you are still having that software in your computer and it’s still unresolvable then you should move on to the next step.

Step 3:
If you are unsuccessful to uninstall that program, don’t worry about it now we are going to remove that software by killing the various tasks running for that software. So, open your windows task manger and find that program process in the processing tab and after that select it and click on “End process” to kill that program process (if running). If you didn’t find the process that means your program is not running so now you can move on to the next step.

Step 4:
Commonly all the program are installed by default in the directory of “C:\Program Files” or in the windows directory. So, open and find that program directory and delete all the files in it.
If you having trouble to find the directory, you can use shortcut to find it easily as shown in fig below.
And after that open the windows program directory to delete the remaining files related to that software. And that’s it now you’ve successfully removed the program. Now just follow the default link like I've shown here to the link of that software's icon in the start menu and delete it to clear its traces from the start menu aswell. C:\ProgramData\Microsoft\Windows\Start Menu\Programs

That's it just restart you computer.


The Software Method

If the above procedure didn't work out for you or you just don’t want to waste your time for searching those software directories and deleting them, then we have an automatic solution for you to remove that program. You’ll just need to download a third party software, I'm using “revo uninstaller” to remove the program because it’s a freeware and also easy to use. I Recommend you to uninstall the program by using the advance mode.
Click here to download the RevoUninstaller

So these were the two easiest methods out there to solve your problem regarding softwares that you were not able to un-install. Anyone can try these steps and the best part is that there is no hazard to the computer's health even on their application and execution.
If you have any queries regarding the same or want to add a few points then feel free to leave a comment.
 

Wednesday, 8 October 2014

Free Software to check System Configuration

When you need to know your specs to figure out if you can play a video game, it's best to just automate the process. But sometimes you need to dive deep and really find out nitty-gritty details about what's going on inside your computer, most often to aid with troubleshooting efforts or determine whether or not its time to upgrade your hardware. 
Maybe you want to check how much RAM your PC has. Maybe you want to know how fast your processor is, or the voltages being supplied to your PC components. Perhaps you've lost a software product key or are trying to figure out exactly which driver your printer is using. Some—but not all—of that info you can just grab from Windows itself, but it's spread across different locations and a pain to navigate to.
A better option is to try out a number of third-party apps that can analyze your system and supply all the information you need. Here's a look at three free, easy-to-use programs that deliver just that kind of information—and then some.

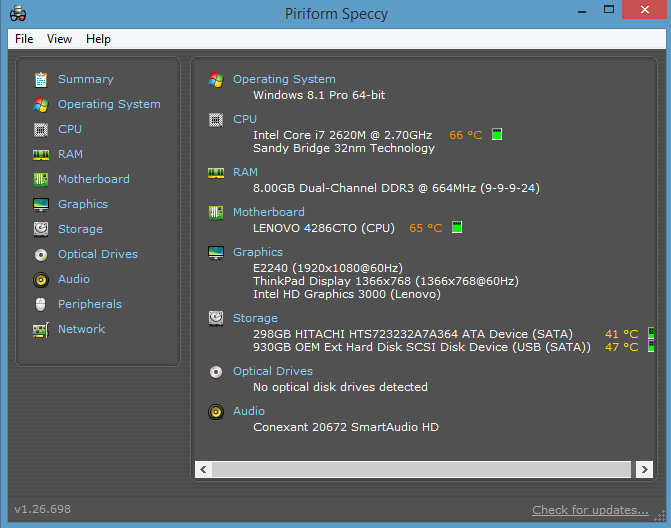
1. Speccy


Of all three apps, Speccy is by far the nicest to look at. It's also very simple and straightforward to use. After you fire up the app, you'll see a summary of your machine stats that includes your operating system type, CPU, RAM, motherboard, graphics card, storage devices (including connected external drives), optical drives, audio hardware, attached peripherals, and network connection.
On the left side is a navigation panel where you can drill down into the finer details about your system.
One nice thing to take note of is that the summary includes the reported temperature of various PC components such as the CPU, motherboard, and hard drives.
You can grab Speccy on FileHippo.

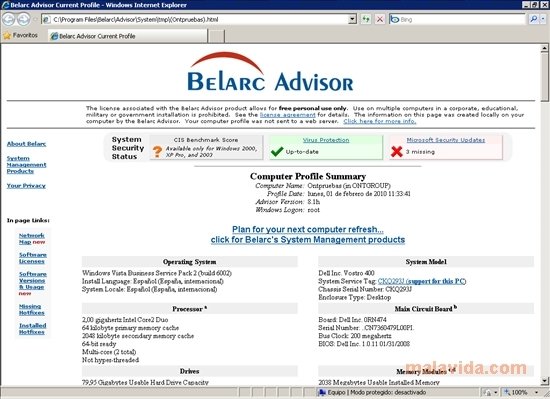
2. Belarc Advisor 


This app scans your system and creates a detailed report that you can view in your web browser. Similar to Speccy, it will give you information on all your hardware configuration, but also provides very detailed information on your software, local network, and attached peripherals—including, crucially, product keys for purchased software such as Microsoft Office and even your Windows key.
If you've misplaced your product key from an email, knowing that Belarc can retrieve it for you is a great back-up.
Belarc can also tell you where each program is installed and how recently you've used it.
You can get Belarc advisor here.

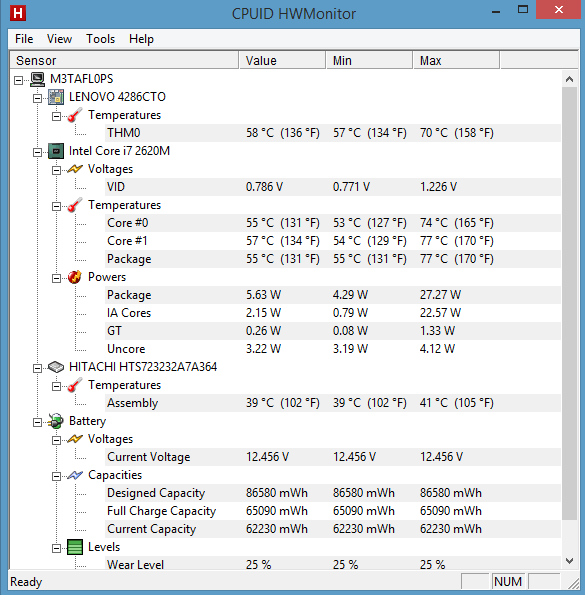
3. HW Monitor


HWMonitor from CPUID looks like something straight out of Windows Explorer circa Windows 98. That said, it's even simpler to look at than Speccy. But HWMonitor doesn't offer the same feature set as Speccy. Instead, this app supplies live information reported by sensors in your system such as voltages, the internal temperature of your PC's components, and battery capacities.
Some hardcore users question the usefulness of HWMonitor's reported voltages, but if you're looking for something to keep an eye on your system's internal temperatures, HWMonitor is a great choice.
Download HWMonitor from CPUID.


Don't be afraid to try these out! All three programs are easy to use and require no more knowledge to use than the ability to install and launch a program in Windows.

Wednesday, 2 July 2014

Must have Free Softwares for Windows

So you just got yourself a new PC or a laptop, but don't know anything else apart from the really obvious stuff that you need to install: Adobe Reader, Office, Firefox, Chrome and so on.

But there’s lots of other lesser-known software that will enhance your experience, that too for free.
These not only help you customize your whole computing experience but also provides you a hand in terms of security and a whole bunch of tiresome tasks including file recovery.
So today I've compiled a list of a few must have software on your system that you can get easily on the web and the best part is they all are free!

Dexpot:


Dexpot is a free (for private use) virtual desktop software. Rather than build up clutter on one desktop, you can use multiple desktops — categorise them as you wish — for work, play, gaming, internet and so on. Each desktop can have a different wallpaper, different icons and even different running applications.
You can switch between desktops with the mouse or keyboard shortcuts.

Rainmeter:


Windows offers limited desktop customisation — that’s why Rainmeter is the choice of tinkerers everywhere. It replaces the entire desktop with a ‘skin’ — you can add widgets, notes, launch applications or just have a unique look to your machine.
What’s more, you can download and use thousands of skins from the community, all for free.

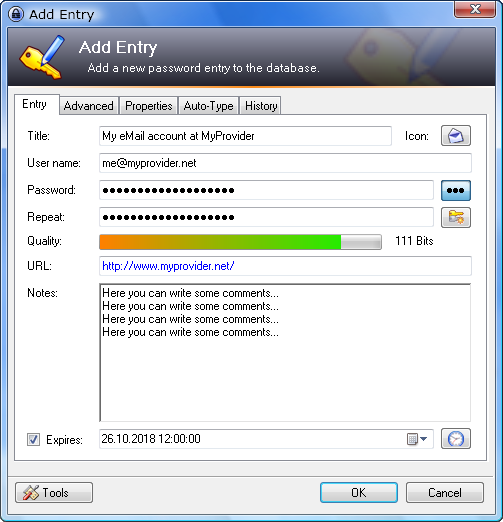
KeePass:


KeePass is the trusted name in secure password storage and retrieval. You can use it to store as many passwords as you like, all secured with a single, master password.
Once locked, the password database is encrypted with secure algorithms (almost impossible to crack) and it stays secure because it is on your machine, not transmitted over the internet.

Recuva:


Accidental deletion is a pain and more likely to occur if you’re not used to a new computer. Recuva from Piriform is a tool that quickly recovers deleted files from camera memory cards, USB drives, the computer’s recycle bin or even an MP3 player.
It may not always be able to recover 100% of the files, but it’s better than a total loss.


Rocketdock:


If you’ve ever wanted a smoothly animated dock like the kind that Mac OSX has, look no further. RocketDock is a completely customisable (unlike OSX) dock that you can use to launch programmes.
You can minimise programmes to it, keep it on any edge of the screen and even keep it in addition to the usual taskbar.

Revo Uninstaller:


Standard removal of programmes leaves some files behind. Over time, this can lead to slowdowns.
Once installed, Revo Uninstaller automatically scans for ‘leftovers’ after a conventional removal and tells you if there are any issues.

7-Zip:


If you frequently deal with zipped archives (and not just the .ZIP kind), then you need something a little more powerful than the usual WinZip that everyone uses.
For starters, 7-zip is open-source and completely free, it can handle packing/unpacking of every format out there, it integrates neatly with the system (appears in right click) and also has its own high-compression format called 7z.

These were a few that i thought about sharing with you all, apart from these you should even install a good but free antivirus in your system to ensure proper protection and safety.
If you have any other software to add to this list then feel free to leave a comment.

Tuesday, 8 April 2014

How to make Windows 7 genuine

Recently I was asked by a lot of friends and family members that how to find a solution to the annoying problem of pop ups saying that "This copy of Windows is not genuine". It obviously happens when you don't have a genuine copy of Microsoft Windows installed. It pops up evey time you boot up your system and removes the desktop wallpaper by a disgusting black background.
The common errors are Build 7601 and Build 7600 near the taskbar.
By giving this solution I'm not supporting piracy as I'm personally against it but just helping those who have been hoaxed into buying a fake copy of Windows either by a retailer or promotional tout. This is to help them avoid the error and message for the time being and give them time to buy a new copy offline or online, as this is the best and permanent solution to this problem.

For this keep following the steps in the order mentioned.

1.Open Command Prompt

Go to the start menu of Windows and type 'cmd' without the quotation marks in the search field of start menu. An option with the name cmd will appear right click on it and select 'Run as administrator' option.


2.Type the commands

With the command prompt open via the run as administrator mode, type in SLMGR -REARM.
Press the Enter key.


3.Done!

Instantly after pressing the Enter key you'll see a pop up windows displaying the message  “Command completed successfully, please restart the system for the changes to take effect”.
Restart your computer and hopefully you will not receive the error again.


This method is only to reset the Windows back to its trail version for 30days, if you want you can repeat the same steps after 30days to reset the time. Make sure you buy a genuine copy soon as this will not work for eternity and has a limit of 4-times in total.
Hope that this article was helpful to you and solved your problem. For any doubts and queries regarding the same feel free to leave a comment.
 

Wednesday, 26 March 2014

How to Solve the AVG Internet Security General Error

AVG is one of the most widely used Anti viruses softwares used around the globe. Its free, effective and easy to handle with a layout easy enough to be handled by a three year old kid!

But one of the most common problems with AVG internet security is its General Error problem which forbids the software connect and install updates from its mother server posing a serious problem for the user.
So today I have a very simple solution to this problem. There are basically two steps to be followed sequence wise.

1. The control panel method:

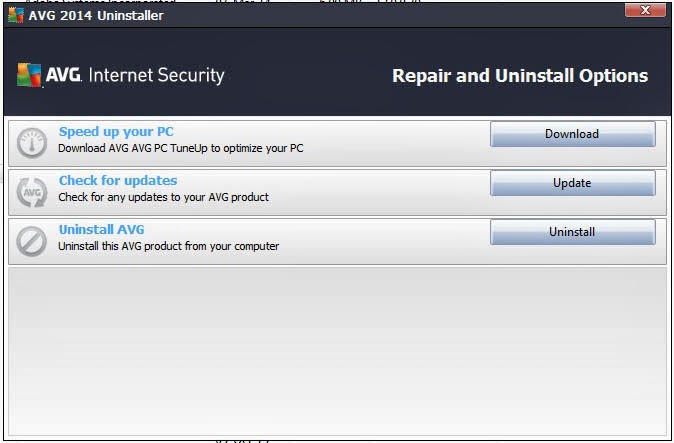
Go to control panel of your OS and click on 'uninstall program' option to find AVG internet security. Click on the uninstall option and a pop-up window will appear with three options, simply click on the 'Check for Updates' option. This will make AVG do a force check and will hopefully fix your problem making your anti-virus up-to-date.


2. Uninstall the program:

This is the last resort! Unistall AVG internet security and subsequently restart your computer. Now when you have restarted your system just go to  the control panel and select the 'Show hidden folders' options, now the default path to the log files is C:\ProgramData\AVG2014\log
Go to this this folder and delete every file present. Restart your PC and then do a fresh installation of AVG. This will resolve the issue for sure, its a tested method and even recommended by the AVG official site.

Hope that these steps will help you out to get you out of your problem and make your system secure and protected again. As always if you have any suggestions to add to this article please feel free to leave a comment.

Wednesday, 5 March 2014

How to lock Computer by USB

In this post you can learn how to Lock your desktop computer or Laptop with your usb drive. Lets see how it is….
While working on the system, on some important work sometimes you need to get away from your computer for a break or any other random reason and you don’t want others to use your system with out your notice.  You don’t want to turn off the system and your system password is known by others. Then how can you find yourself a way out of this ordeal?
In this type of situation the below trick will be very helpful for you to prevent access to your system by others without your permission.
To lock our computer we just use win+L key combination from keyboard. If others know the password of your system then they can easily access your system and some times they see your important and confidential work. 

How to Lock Computer With USB Drive :


* It is a very simple process. Just install the below software.
* To lock computer with USB drive we have to use one software called USB System Lock. 
* After installing this software then simply insert your USB drive and click on Next. 
usb1
* The software creates a random key and store it in your Pendrive and also in windows registry also.
* From now onwards if you lock your computer and to restart you have to insert the USB, otherwise your system will not be opened.
* Whenever you restart the computer it will ask you to insert the USB which you setup at the time of installing USB System lock.

About USB System Lock :

This is a program written in Visual basic and run on Microsoft windows. It is a free version. It can fully protect your computer on normal booting. While you run your computer in safe mode it will not work. It bypass the task manager also. So nobody can enter without the USB which is configured at the time of Installation.
Download : USB System Lock


Tuesday, 25 February 2014

Recover deleted files on Windows

Many a times you end up accidently deleting an important file or even a bunch of files inside a folder either on your portable devices, PC or laptops. This is really problematic and traumatic even for many. But not to worry today I have a solution to this issue in a way that even a kindergarten kid can execute it!
You can recover deleted files on your Windows PC’s internal/external hard drive, SD card or any other external drive using UndeleteMyFiles Pro software. It is not freeware, but you can download a free trial for 10days time period from any reliable download site.
You can use the program to search for deleted files quickly and easily and restore them to a specific location. It is very easy to recover deleted files using this software. Here is how:

1. Download and Install UndeleteMyFiles Pro. Here’s the link: UndeleteMyFiles Pro – CNET Download.com
2. Run UndeleteMyFiles Pro and click on the File Rescue icon on the main screen.
3. On the File Rescue screen, select the drive that contains the file(s) you’ve deleted accidentally and wish to recover.
4. Click the Scan button at the bottom of the screen.
5. After the scan is complete, a list of deleted files appears. Click on the checkboxes next to the file(s) you want to restore and click the Recover button.
6. A Browse For Folder dialog box appears. Browse for the folder which you want to restore deleted files to and click OK.

A warning message appears if you’ve selected a folder to restore deleted files to in the same drive from which the files were deleted. It is recommended to restore the files to a different drive location.
Again a dialog box appears asking if you want to recover the file(s)to a specific location directly or to recover it/them with their previous directory path. Click Yes to recover the file(s] to a specific location or click No to recover it/them OR] orig/them with their original directory path.
After completion of the recovery process, a dialog box appears to display the statistics about the process. Click OK.

Friday, 14 February 2014

How to increase Computer Performance without any software

When we buy new computer or Laptop, then it works lightning fast with great speed. All the processes take no time to be performed, but as the time passes by, when you install many programs on your OS, then suddenly you feel some lag in computer and it takes longer to process things as compared to before. As your PC slows down, you would then be looking for some tips for making your laptop or PC runs faster.
So here are some tips to speed up or optimize your computer. This a very easy tutorial about optimizing your computer, especially the one running on Windows OS, with 10 easy tips, tricks and steps.

1: Use Performance troubleshooter regularly

Performance troubleshooter might help you as it automaticaly finds and fix the common errors for you. You can do it so by following simple steps.
Open the Performance troubleshooter in the Start , then Control Panel then troubleshooter, and then click Troubleshooting. Under System and Security, click Check for performance issues.

2: Delete unwanted Programs

As you know, pc will slow down if you put much load on it. The load will be produced automatically when you install many programs. Therefore you should try cleaning or deleting those programs which you don’t use.

3: Limit Startup Programs

When you start your pc, then it takes some time to start all the programs and services that you installed. If you installed so many services, so then it will take more time in startup, So you should limit your programs at startup. You can manage startup program by using System Configuration Tool. this is highly recommended for people who are running old processors or have less amount of RAM installed.

4: Hard Disk Defragmentation


When your hard disk get fragmented, then it takes more time in processing data. Therefore it slows down pc’s performance. User Disk Defragmentation Tool to Defragment harddisk, which rearrange data in standard format and makes your pc work faster.

5: Clean Unnecessary Files

You should Delete unnecessary data and files from your computer in order to keep your pc optimized.

6: Run less number of Programs at once

To keep your Computer running faster always, you should run less number of programs or services at a time. If you run many programs, then it will slows down the working of your computer. Recommended for systems running on single or dual core processors.

7: Turning off Visual Effects

If your system is working slowly then you should give turning off visual effects a try. As it will help a lot in processing the programs by freeing a large amount of RAM memory.
To adjust all visual effects for best performance:
1.    Right Click on My Computer, Go to properties, And then Click on Advanced Setting Tab.
2.    Click Adjust visual effects.
3.    Click the Visual Effects tab, click Adjust for best performance, and then click OK
8: Restarting your Computer regularly:
You should restart your computer or completely shut it down regularly once in a day or two, as it closes down all running processes and makes your pc take a deep breath after a long hardworking day.

9: Increasing RAM Value

The most important of all the things, if your pc is really slow then you should go for increasing your Random Access Memory Value. This will give you a boost in your pc’s performance. Buy standard brabd RAM modules like Kingston, Corsair or RipJaw.

10: Use of Antivirus

If your Computer is working slowly, then there is a chance that your files might be infected with virus or spyware. Make sure you have installed a fine Antivirus Program in your computer and also it should be kept up-to-date. If you want a free anti-virus program then follow this link.

At last, after trying all the above tricks if you still don’t get any significant difference in your system’s speed, then you should either go for a new PC or laptop (upgradation included) or consider downgrading your OS or installed programs, as there is no other way.
Hope this will work for you and as always feel free to leave anything that you want to add to this article or a query regarding the same in the comment box.

Monday, 3 February 2014

What is Bitcoin Mining and How to mine bitcoins

Bitcoin is a new kind of virtual currency that exists only in the mysterious world of the Internet. It sprang up after the financial crisis of 2008, when a bunch of geeks wanted to create sweet spots for their money to rest and increases obviously with the use of sheer technology which was made of of digital bits. That currency is Bitcoin.
What’s really interesting about this brand-new currency is that it’s mined through good old-fashioned hard work—by your PC though, not you. You simply run a program on your computer and eventually a virtual coin will appear. The more powerful your setup, the faster the coins will arrive, theoretically at leas. It uses spare computing cycles to help churn through complicated equations, the final equations result in a payday for the person willing to devote the resources necessary to acquire them. Of course, it’s not quite that simple, and there are pitfalls and caveats, as always, so follow along while we take you on a brief tour of this brave new frontier. And if you become a virtual millionaire down the road, I want a finder’s fee.
Since there is no central authority or government agency providing oversight, users are allowed to semi-anonymously transfer money to one another, making it similar to any other peer-to-peer transaction, except this time, instead of swapping torrents, you’re swapping virtual cash. This lack of oversight is one of the key benefits, and downsides, to Bitcoin at this time, making it the latest frontier in the battle over how much freedom should exist in the online world. This state of anarchy has also made Bitcoin quite intriguing for people who have a lot of spare GPU cycles.
But before you fire up your GPUs and quit your day job, let’s examine the basics of Bitcoin so you can decide if it’s something you even want to bother with, because—spoiler alert—it’s not for everybody.

Bitcoin in short....

Bitcoin currency consists of four denominations, with the largest being one bitcoin (BTC), followed by a milicoin with a value of 0.001 BTC. One step lower is a microcoin with a value of 0.000001 BTC, and the smallest denomination is a satoshi, with a value of 0.00000001 BTC. Since its inception in 2009, bitcoin value has varied widely: $1 could buy you one bitcoin at the beginning of 2011, but you'd need $230 to buy that same bitcoin in April 2013, making it a damned good investment for those who got in early. Bitcoin is a different kind of currency though, so naturally it works a bit differently than traditional currencies. While your local bank keeps a private ledger for deposits and withdrawals, Bitcoin’s ledger, called the block chain, is public, and everyone can download a copy. This allows anyone to effectively audit transactions sent over the network, which has elicited fears of a Panopticon of constant surveillance. This ease of monitoring has also caused many users to actively conceal their identities on the Bitcoin network, which is somewhat easy to do since bitcoins are sent to an alphanumeric address that is randomly generated by a virtual wallet.
While all transactions and wallet addresses are recorded in a public ledger, the keys needed to access funds are private, which ensures that only you have access to your bitcoins. Each transaction over Bitcoin is verified by a software program that generates an SHA-256 hash, which is sent to the public block chain. Once it’s in the block chain, it is confirmed that the money has been left at your address.

Bitcoin Mining

The more interesting way to acquire some coin, at least for people like you and me, is to use your PC to mine them. To get started, you register online to either join a mining pool or start mining solo. There are dozens of popular pools, with some reaching over 30,000 users, and they are always accepting new members. You just need to find a pool and register, then download a mining program that will start crunching numbers for your pool. GUIMiner is one of the most popular mining programs for new users because it's one of the few applications with a graphical user interface, so it keeps users away from the command line and will have you mining in only a few clicks. If you had to register for your pool, select your pool from the server box, insert your username and password in the appropriate boxes, then click “Start mining.” If your mining pool is not listed, select Other and insert your mining pool's URL and port number.

What Kind of Hardware Do I Need to mine Bitcoins?

Before 2010, people were crunching numbers using their CPU; then the GPU was introduced to bitcoin mining and drastically changed the game. With its fleet of specialized compute units, GPUs crunch bitcoin many factors faster than even an Intel Core i7 CPU. As an example, a Radeon HD 7970 can reach over 700Mhash/s, whereas a GTX 680 can crunch a little more than 110Mhas/s, and an Intel Core i7 4770k can only achieve a paltry 8Mhash/s! Keep in mind, though, that one Radeon HD 7970 would take over a year to chew through a Bitcoin block, so you'll need some major firepower to increase the speed at which the transactions occur. One more problem: As more users compete to mine bitcoins, the difficultly is automatically adjusted, making it harder to mine, ensuring bitcoins are constantly mined at approximately one block every 10 minutes.
With four Radeon 6970s, this rig uses a custom open case to keep the GPUs cool. This monster machine hunts for bitcoins at about 2,400 MHash/s

To use your GPU to mine bitcoins, you need to install OpenCL or CUDA, which are included in the latest driver packages from AMD or Nvidia, and then select your GPU in the GUIMiner device box. GUIMiner’s Extra Flags box allows you to specify the GPU load you want and even the fan speed to keep things frosty. For best performance on AMD cards, we generally found “–v –w128 –f0” to be the optimal settings, and “–f0 –w128” on Nvidia cards.

ASIC Miners: The Bitcoin BigGuns

An application-specific integrated circuit, or ASIC, bitcoin miner is a microchip specifically designed to run the Bitcoin calculation. These chips' physical circuits are built only to mine bitcoins, really fast. While an Asus Ares II Radeon HD 7990 can mine bitcoins at a blistering 1,420Mhash/s, a similarly priced ASIC miner can hash 25,000Mhash/s! Almost 20 times faster at the same power rating, making ASIC miners the go-to hardware for those trying to get rich mining bitcoins. There are a variety of companies designing these bitcoin mining integrated circuits, but sadly most are still vaporware, even after taking pre-orders. Butterfly Labs, Avalon ASIC, and ASICminer have managed to ship their products in limited quantities, starting at around $100 for a plug-and-mine USB model that can mine at about 300Mhash/s and going as high as $1,250 for a 25,000Mhash/s miner. But with the difficultly of bitcoin mining increasing and the high price of really powerful ASIC miners, many people are doubtful that serous money can be made, even with these specialized devices.

Managing Your Bitcoin

Now that you’ve got your gear and are mining away in a pool, you had better get ready to receive your first bitcoin, and to do that you’ll need to set up a virtual wallet. Since Bitcoin is all about user control, you can decide how you want to set up your wallet, so you can choose an online wallet such as Blockchain or an offline wallet such as MultiBit (www.multibit.org). Online wallets are the most convenient, as all your addresses and private keys are stored in the cloud, though this does leave them vulnerable to hackers and other malicious attacks. In contrast, desktop wallets are stored locally and are best for people who like to have all their data where they can see it; you just have to manage your private key files yourself.

Once you’ve chosen a wallet and set it up, you will then need to know your address so that you can receive bitcoin. Using MultiBit, you can simply select the wallet where you want to receive the funds, select the Receive tab, and MultiBIt will show the address of that wallet. To help people preserve anonymity, a new wallet and address can be used for each transaction by one individual, which makes tracing transactional histories almost impossible.

Taking your cash outs

When a Bitcoin block is completed, the 25-bitcoin reward is split among the pool miners in one of several different methods. Pay-per-Share (PPS) is one of the safest ways to pool-mine bitcoins, as the pool operator pays you immediately for each share of the block you compute. The operator pays users out of his or her own pocket before getting reimbursed for the block by the Bitcoin network.
Another method of compensation is named a Score pool, and it rewards you for your share of the block, but your payout is weighted by the amount of time that has passed since the beginning of the block, so with a Score pool you are rewarded for crunching the most numbers and for your loyalty to the pool.
Alternatively, a Pay-on-Target (POT) pool rewards each user based on the difficulty of their compute contribution. This is an attractive pool for those with high-powered PCs. Some of the most popular mining pools include 50BTC.com (a PPS reward system), Mining.bitcoin.cz (a Score reward system), and BTCGuild.com (a variant of the PPS reward system). 

Also, in order to ensure an even pace of bitcoin development, the reward amount is cut in half every four years and currently is set at 25 bitcoins a block. In the year 2016, it will be cut in half again, and that will continue until 2140, when all 21 million bitcoins will be mined and bitcoin production will stop.

So this was all that we had to say and review about the whole concept of Bitcoin and its mining.
If you have any further points to add to this which I must have missed upon feel free to leave a comment and as always your queries are welcome.
Note: Bitcoin Mining is not a game, its a serious business and should be done with utmost seriousness.