AMD first revealed its Fiji GPU in June at E3, showing the world the Fury X and Fury graphics cards. The company also teased a card that was much smaller and based on the same architecture. AMD has finally revealed the details of the Radeon R9 Nano, and you might be surprised by the specifications.
AMD's upcoming card is the R9 Nano. This is a Fiji based graphics card, but the company is not branding this a "Fury" card. Instead, AMD has gone with the "Nano" branding to represent how small of a footprint the new card has. R9 Nano features a tiny 6-inch long PCB, and the cooling solution is condensed within that space as well.
AMD is positioning this card as a flagship GPU designed for Mini-ITX gaming builds. Contrary to what many people have been speculating, the Nano is not a cut down version of the Fiji GPU. In fact, it features the full 4096 stream processors found in the Fury X. The main difference with this solution compared with the Fury X is that AMD has emphasized power efficiency. The Fury X was focused on maximum power, with less consideration for power consumption.
To keep the power draw limited to the rated 175 W peak, the Radeon R9 Nano adjusts the GPU clock speed for each game or application. In more demanding situations, the clock speed will drop to keep the power draw below 175 W. Less demanding applications could see the clock speed run as high as 1000 MHz, but AMD said it will more often run closer to 900 MHz. The company noted that the last 10 percent of performance comes from the last 50 percent of the power draw. As a result, AMD's engineers designed the card to be able to pinpoint the most efficient spot on the power-to-performance curve and set the clock speed dynamically for maximum efficiency.
With such a small card, you might expect the GPU to run very hot, but AMD spent significant resources on the cooling design for the R9 Nano. To cool the Fiji GPU within such a small package, the company designed a custom vapor chamber that contacts the ASIC directly and transfers heat to a set of flattened copper heat pipes, one of which is dedicated directly to the VRMs, giving them active cooling.
AMD said the flattened heat pipes allow for more fin volume within the shroud, while also keeping the heat pipes within the confines of the cooler's shroud. The fins inside the cooler are oriented horizontally across the card. AMD said this allows for 80 to 90 percent of the heat to be vented out the back of your case, especially in a positive pressure environment.
AMD claimed this vapor chamber cooler delivers performance similar to that of a water cooling solution, and as a result was able to set the card with a temperature target 20 degrees lower than what the R9 290X carried. The R9 Nano is targeted to operate at 75 degrees, though the company noted that the card won't be throttled until it peaks beyond 85 degrees.
Even with the smaller size, and cooler temperature, AMD claimed that the R9 Nano operates 16 decibels quieter than the R9 290X, as well. It features only one downward-blowing fan, but AMD has targeted 42dB as the maximum sound level, which it compared to the noise levels found in a library.
Because AMD is positioning this card as a premium option, it stuck with the high-grade materials used to construct the shroud of the R9 Fury X. The Nano features an all-black PCB, and the shroud is made of aluminum with a brushed finish. The faceplate from the Fury X was replaceable, and AMD offers a 3D file to customize and print your own. The company said it will not be releasing the same sort of file for the R9 Nano because the fan mounts directly to the cover, so it's much more complex to make.
AMD did note that it has been working with a number of water block manufacturers to create blocks for the R9 Nano, and said that overclocking the card will be possible, though the company suggested opting for the R9 Fury X for those who really want to overclock a card. The Nano is designed with power efficiency in mind, and therefore it becomes a two-step process to overclock the card: First, the power limit must be increased, which lets the GPU run at 1000 MHz in all applications. The GPU can then be overclocked, but doing this essentially makes the card a Fury X anyway. Nano is designed for those who prioritize low power draw.
Although it has water block support, AMD noted that it has no intention of unlocking the clock speed of the HBM memory of R9 Nano cards. When pressed about whether custom partner boards will be released, AMD said that we may see some custom cooling variants in Q4, but AIBs will not have the freedom to change the reference specifications of R9 Nano cards.
AMD said the R9 Nano is in a class of its own when compared to other Mini-ITX-sized graphics cards. The company claimed the performance of the Nano should be comparable to the air cooled Fury when left with its factory power limits. The next comparable GPU in this size class is the GTX 970 ITX, and AMD claimed that the R9 Nano delivers 30 percent faster performance when gaming at 4K.
AMD will release the Radeon R9 Nano in two weeks, on September 10. The company said the delay between the announcement and the release is the ramp up supply, so the R9 Nano should be available on release day.
AMD has positioned the Nano as a flagship card, and as such, the company set the MSRP of the Radeon R9 Nano at the same $649 price tag as the water cooled Fury X.
Look out, mini-ITX: you’re not the smallest DIY board on the block anymore. Intel has launched a new 5x5 motherboard standard for ultra-compact form factor PCs. According to reports, the board sits between the mini-ITX and the Intel NUC in terms of size and functionality.
The 5x5 is 29 percent smaller than mini-ITX at 147x140mm (5.5x5.8 inches), making it the smallest socketed board available. Just like the mini-ITX (and unlike the smaller NUC), it has a socket which fits LGA processors. The 5x5 also has 2 SODIMM memory channels, and you can add a 2.5-inch SATA drive or M.2 solid state drive. In addition, it will feature support for wired and wireless connectivity.
The 5x5 provides Celeron to Core processor scalability, supporting both 35W and 65W TDP CPUs. Intel says that despite the small size, it offers the same CPU upgradeability as a full-sized desktop. It is important to note however that you won’t have a full length PCIe slot with the 5x5. So, you’ll need to stick with the larger Mini-ITX if you want to add a PCIe graphics card to your system.
A fixed CPU XY location on the motherboard is required with the standard, which makes building cases with integrated cooling systems a bit easier.
There are currently no details on the 5x5’s price or availability. According to Digital Trends, there are suggestions that the 5x5 won’t be a consumer product, and will instead be used for device manufacturers to build systems around. If 5x5 did come to market, would you consider it for an ultra-mini build?
Leaked slides and information about AMD's mini Fury card, the R9 Nano, point to an imminent launch. According to Thai website Zolkorn (via VideoCardz), the R9 Nano will launch on Thursday, August 27. AMD_UK tweeted last week that the launch was “just around the corner.” And now slides are out in the wild showing off the Nano's HBM configuration, with a very similar configuration to the larger Fury X.
The tiny R9 Nano was shown off in June at the PC Gamer Show alongside the R9 Fury X and a dual-GPU version of the Fury, which AMD said would be coming at a later date. The Nano is rumored to have the same GPU configuration as the Fury X, albeit downclocked in order to meet a 175W power consumption requirement from its single 8 pin PCIe connector. So, the Nano won’t be quite as powerful as the Fury X out of the box, but for its size it still packs a punch. It’s likely set to be the most powerful 6-inch card available.
Videocardz reported on a leaked datasheet which describes the Nano’s engine clock as “up to 1,000 MHz”, which is much more than expected. It also has 4,096 streaming cores, which is impressive for its size and limited 175W power. The leak also confirms that the Nano features 4GB HBM1 memory across a 4,096-bit memory bus at 500MHz clock speed. It has the same number of TMUs (256) and ROPs (64) as the R9 Fury X, and its computing power is only slightly lower at 8.2 TFLOPS compared to the Fury X’s 8.6. That's a hell of a lot of power for such a tiny card.
AMD boasts 2x performance density and 2x performance per watt for the Nano over the Radeon R9 290X graphics card. The company’s new High Bandwidth Memory, the Fury’s big selling point, replaces the GDDR5 that the 290X uses. Cells are stacked vertically, so the effective bandwidth is faster and more power efficient. According to TechPowerUp, AMD recently released some numbers that showed the Nano also has a 50 percent performance per watt advantage over the R9 Fury X, which makes sense given its lower power draw. It’s a feisty little guy.
All that's left to pin down is price, which we'll find out once the R9 Nano is available.
Since the advent of the new Intel Haswell-E series processors Gigabyte has been catering to all the sections of the market making and attracting customers through a three pronged approach.
First, its Ultra Durable boards cater to the widest cross-section of potential buyers, with models ranging from the budget-oriented X99-UD3 up to the high-end X99-UD7 Wi-Fi.
Next, the Overclocking series of boards are for extreme overclockers aiming to push clock speeds, and consequently voltages, to dizzying heights. Buyers of these boards can expect voltage measurement points, sub-zero cooling, and competitive benchmarking tools.
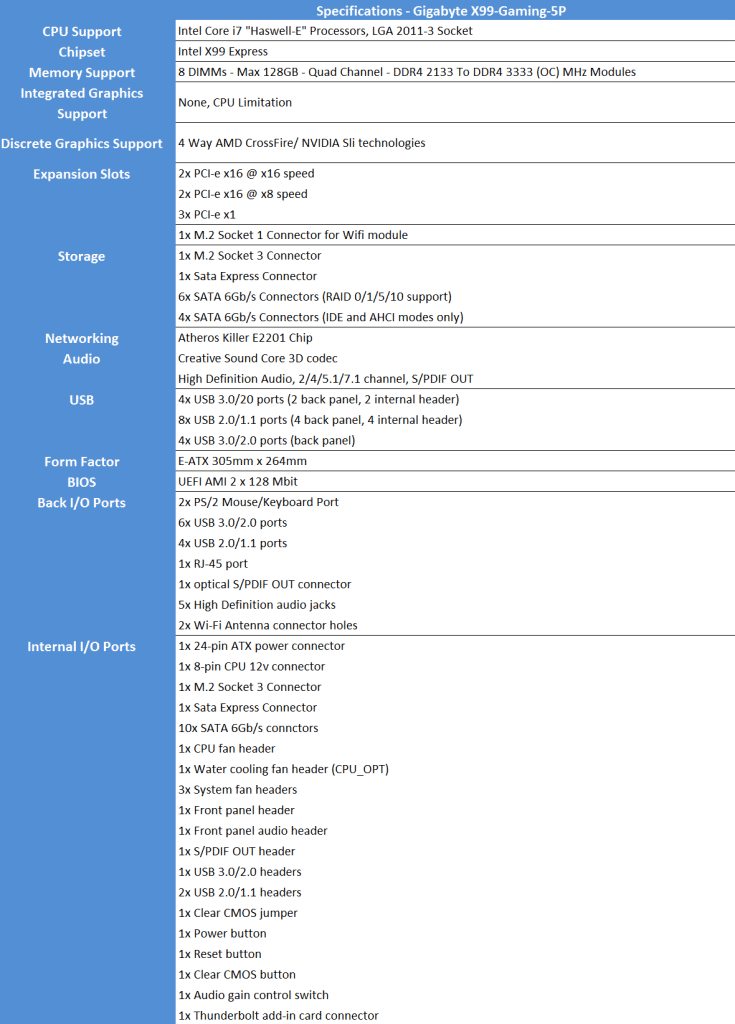
Finally, the G1 Gaming series of boards is designed to appeal to, well, gamers. Gigabyte outfits these boards with beefed-up onboard audio, gaming-focused networking controllers, and LEDs-a-plenty. One such board is the X99-Gaming 5P which Gigabyte had been generous enough to send over to me for review.
The motherboard conforms to the EATX form factor, meaning that you will need a wider than standard case to house the board. While many full tower cases will accommodate EATX motherboards with ease, there are some mid-tower cases, such as the NZXT H440, which only officially support ATX boards.
Inside the Box
The Gigabyte X99 Gaming 5P comes in the same old durable and attractive packing from Gigabyte, its a solid heavy cardboard box with the big eye letting you know right away that its a G1 Gaming Series motherboard. The back of the box has a picture of the motherboard, showing a list of features, specifications, and the I/O Port layout. Flipping the top panel open reveals a window showing off all of the Gaming 5P’s motherboard goodness. With the motherboard out of the box you can find all the accessories and necessaries that it comes along with.
The Gaming 5P comes with the following:
Coming to the motherboard itself, the X99-Gaming 5P is decked out in the
same familiar red-and-black color scheme as Gigabyte's other gaming
boards. A pure-black PCB combined with Gigabyte-exclusive jet black
Nippon Chemi-Con capacitors, rebranded by Gigabyte as "Durablack" caps
gives the board a stealthy look. All in all I'm pretty impressed by this
layout as I'm a big fan of the Gigabyte Z97X chipset gaming series's
design and this one is some what a reminiscent of the same in the X99
flavor.
The motherboard features Five fan headers, including the CPU fan header (red circle), Three system fan headers (yellow circles) and a CPU_OPT fan header (green circle). This can be used for dual fan air coolers or to control the pump in liquid cooling systems.
Monitoring capacity is provided by ITE’s IT8620E chipset. Further ITE chipsets (2x IT8792E and IT8951E) provide various functionalities for the motherboard. Dual BIOS chips are used for redundancy.
The motherboard also features a total of Ten SATA 6GB/s ports. The X99 chipset [yellow box] can run Six SATA ports. Although Two of these ports switch between the SATA-Express, or the M.2 socket 3 Slot. The second controller [green box] can run Four additional SATA ports.
For those who want to use a M.2 SSD plus an on-board WiFi card, the Gaming 5P has the perfect solution. Dual M.2 Slots offer you the ability to use the bottom slot for a WiFi adapter card (30mm long), and the top slot for a M.2 SSD (60mm or 80mm long).
One key feature that truly makes it an enthusiast grade board, in my books, is the CPU_MODE dip switch located right next to the SATA connectors. Flipping the CPU_MODE switch to “on”, enables all of the 2083 PINs on the CPU socket. Having a switch to enable or disable the OC socket is a nice feature as it allows you to run your CPU within normal specs when not Overclocking. Also note that the CPU socket, memory, and PCIe x16 slots are gold plated with 30 microns of gold. This is twice the industry standard.
As claimed by the company, the X99 Gaming 5P supports quad-GPU setup. But this may not be true in every case. Since the board does not have a PLX chip onboard, all the PCIe lanes are powered by the CPU.
2 x PCI Express x16 slots, running at x16 (PCIE_1, PCIE_3)
2 x PCI Express x16 slots, running at x8 (PCIE_2, PCIE_4)
All four x16 slots are usable, no matter how many PCIe lanes your CPU provides. The processor choice just governs how many lanes each x16 slot gets: for models with 40 lanes, the four slots will have lane arrangements of x8/x8/x16/x8, while those running Core i7-5820K are looking at x8/x8/x8/x4.
But Gigabyte has definitely innovated over here by installing an onboard external clock generator along with making a direct connection of the CPU to one of the PCI-E x16 lanes bringing the overall PEG bandwidth to 320GBps rather than the 256GBps that should've been in absence of a PLX chip.
The Gaming 5P also features true enthusiast grade, on-board audio as well. Creative’s Sound Core3D quad-core audio processor handles the sound processing, offloading that chore from the CPU. You’ll also find support for high-quality audio headgear. There’s a front headphone amplifier that pumps out loads up to 600 ohms, and there’s a gain boost switch (red circle) to increase amplification from 2.5X (default) to 6X (high amplification). The latter is intended for speakers or headphones with high impedance. GIGABYTE also includes its OP-AMP (operational amplifier) technology (yellow circle), which lets you swap op-amps to change the sound to suit your needs. Out of the box, the Gaming 5P features a TI Burr Brown OPA2134 op-amp.
Along the bottom, we see all the typical headers for front USB, audio, buttons and an addition PCI power connection in the form of a male molex connector.
This board features the standard 8-DIMM single latched slots supporting up to 128GB of 3333MHz memory. The CPU and DIMM slot pins feature upgraded gold-plated pins, allowing better connection quality and higher bandwidth allowance.
The I/O side of the board presents us with a wide array of connections. Firstly, two separate PS/2 ports, then 4x USB 2.0 ports (yellow), 5x USB 3.0 ports (Blue), 1x USB 3.0 port enabled for Q-flash and the recommended port for keyboards/ mice for initial boot (white). You will also find 1x gigabit LAN port, 5x HD audio jacks, 1x S/PDIF optical port and 2 empty WiFi antenna holes.
Key Features
Six Phase Digital Power Delivery System: The power delivery to the CPU is all digital. IR Digital PWM & IR PowIRstage® ICs provide precise current sensing accuracy, and better thermal load distribution. The MOSFETs used are six International Rectifiers IR3556M PowIRstage solutions which are managed by the same company’s IR3580 PWM controller. All six chokes are marked ‘1007R3 R15 03PH15 K’.
The Gaming 5P also features server level chokes. Gigabyte has used high end, enthusiast grade components to make sure that you get the most out of your motherboard.
Interconnected Chrome plated Heatsink: Gigabyte cools the MOSFETs and the X99 chip on the south bridge (red circle) by using a sturdy metal heatsink that is connected via chrome plated heatpipe to the cool & stabilize the system. The yellow circle highlights the patented dual bios feature of the board.
The heatsink is LED backlit and this is what I'd always missed in the previous generation boards.
LED illuminated heatsink, audio trace path and I/O Shield: The back-lit I/O shield is a very nice touch and I think it makes finding ports in a dark room easier. If for some reason you find the back-lit I/O shield (or Audio Trace Lighting) too bright, you can turn it off using the bundled Ambient LED software or you can configure it to glow up in accordance with sounds of music using "Beat Mode" or simply switch to a soothing breathing mode via the "Pulse Mode". Creative SBX Pro Studio Audio Suite: SBX Pro Studio™ suite of audio playback technologies deliver a new level of audio immersion. Realistic surround sound, the ability to clearly hear specific sounds in a gaming environment are just a few elements of SBX Pro Studio that enhances the overall experience, be it movies, games or music.
Quad DAC-UP USB Ports: Featuring Quad USB 2.0 ports, GIGABYTE USB DAC-UP provides clean, noise-free power delivery to your Digital-to-Analog Converter. DACs can be sensitive to fluctuations in power from the other USB ports, which is why GIGABYTE USB DAC-UP takes advantage of an isolated power source that minimizes potential fluctuations and ensures the best audio experience possible.
BIOS and Bundled Software
BIOS
The X99-Gaming 5P has the same UEFI as Gigabyte's other 9-series boards including the UD5 WiFi which I'd reviewed earlier. Users are presented with three firmware interfaces: a novice-friendly Startup Guide, an enthusiast-oriented Smart Tweak UI, and an old-school Classic Mode, all switchable to one another by pressing F2. Here's what Smart Tweak UI looks like on the Gaming 5P:
Upon entering the 1920×1080 (dependent upon your monitor’s resolution) UEFI, Gigabyte opens the frequency page. The interface packs large amounts of information into a single screen by virtue of its 1920×1080 resolution. Voltages, frequencies and other monitoring parameters are consistently scattered around the outside of each page.
A number of speed parameters and performance boosts can be selected via the Frequency page and its subsections. There are automated overclocking profiles which increase the speed of a relevant CPU to as much as 4.3GHz, which is impressive.
Entering Classic Mode provides everything included in Startup Guide and Smart Tweak, plus an even more detailed set of options. The look and feel of Classic Mode is a little old school, but it works well and is easy to navigate. When entering Classic Mode, you first land in the M.I.T. (Motherboard Intelligent Tweaker) area where everything you need to overclock is found. There are six sub menus where you can access frequency, memory, and voltage settings. The sub menus also contain your system monitoring, fan control options, and a few other miscellaneous options.
One of the features that caught my eye here is the ‘CPU upgrade’. I’ve never seen a feature like this, so being curious and clicking it, it opened a small list of compatible CPU’s and some conservative overclocks. I don’t see why the 5820K and 5930K are possible options here as the BIOS already knows I’m using a 5960X. You might get some bad experiences from novices clicking a CPU that isn’t theirs.
Bundled Softwares
As with the board's firmware, the X99-Gaming 5P's included software is essentially the same as what the other X99 boards, except for one small difference, this is a gaming board. As a result, the interface wears a coat of red paint rather than the traditional blue!
Everything you need to get the most from your system can be found in this software suite. Desktop automatic overclocking comes via the EasyTune app, or you can choose to manually overclock as well. Additionally, there are fan control options available, EZ Setup options for configuring storage settings, and a host of other utilities within APP Center. The thumbnail images above will show you a partial list of what’s available, but suffice to say APP Center is well worth installing to explore it’s many useful tools.
I managed to over clock the Intel i7 5960X to a respectable 4.5Ghz at 1.25V. Any further over clocking was easily possible but the Corsair H110 wasn't able to keep the temperatures in the safe limit and we experienced thermal throttling. With the use of a better air cooler or a larger liquid cooler I'm sure the Gaming 5P can hold the 5960X at around 4.7Ghz stable.
Super Pi Moded
This test shows that the X99 Gaming 5P is a very capable motherboard and is able to harness all the power of the i7 5960X. It also shows that there is no real memory bandwidth issues. Hence the value obtained was 7.7s at OC 4.5Ghz which is a great score.
Intel XTU
Intel® Extreme Tuning Utility (Intel® XTU) is tweaking and monitoring software used not only for benchmarking a system but also is a handy over clocking tool. On an over clocked Intel 5960X at 4.5Ghz an impressive score of 2249 was obtained which is a testament to the high performance of the Gigabyte X99 Gaming 5P in harnessing the power of the processor and other components.
CineBench R15
Cinebench uses Maxon's Cinema 4D engine to render a photo-realistic scene of some shiny balls and weird things (we miss the motorbike). The scene is highly complex, with reflections, ambient occlusion and procedural shaders so it gives a CPU a tough workout.
As Cinema 4D is a real-world application - used on films such as Spider-Man and Star Wars - Cinebench can be viewed as a real-world benchmark.
3D Mark
3DMark Firestrike is Futuremark’s latest creation for testing the GPU performance of high-end gaming PCs using Direct X 11 graphics.
Crystal Disk mark
CrystalDiskMark is designed to quickly test the performance of your hard drives. The program allows to measure sequential and random read/write speeds. Here we are using the ADATA SP920SS 256 GB SSD and its performing flawlessly. The speed of the SSD is matching with the Rated speed by ADATA, so there is no bottleneck issue.
DPC Audio Latency Analyser
Since the X99 Gaming 5P is all about its Creative Sound Core 3D so we put it to test using DPC which is a Windows tool that analyses the capabilities of a computer system to handle real-time data streams properly. It may help to find the cause for interruptions in real-time audio and video streams, also known as drop-outs.
Its clearly visible that the output of the Creative Sound Core 3D is much better than the Realtek ALC 1150 chip used in other boards making the Gaming 5P the ultimate multimedia champion in the Gigabyte family.
Assasin's Creed Unity
Due to its poor PC port optimization the AC Unity puts heavy load on both the CPU aswell as the GPU of any configuration so we used it to see what FPS range our system could produce on the Gigabyte X99 UD5 WiFi. The results were great and we obtained good FPS on Ultra Settings at 1080p resolution.
Tomb Raider 2013
Being a graphic intensive game with beautiful textures to render we put Tomb Raider at Ultra settings & 1080p resolution on the system to see what kind of performance we can obtain.
Crysis 3
Every PC enthusiast knows that the Crysis 3 is very punishing game for any configuration especially when you set all the settings to maximum. We did the same and the results were more than impressive!
My Verdict
After my testing and living with the GIGABYTE X99-Gaming 5P motherboard, I’m completely clued in. The key target audience for this board is gamers and overclockers! If you load the motherboard up with 4-way SLI/Crossfire, you’ll have more bandwidth available than a lot of competitor boards offer. Couple that with the AMP-UP audio, Killer E2201 LAN, and a couple gaming oriented pieces of software included in the bundle, and you’re well on your way to a powerhouse gaming machine.
What's more, when it comes to overclocking, the X99-Gaming 5P is a
breeze to use. Less seasoned tweakers will appreciate the pre-baked
profiles and the auto-tuning feature in Gigabyte's Easy Tune utility,
and veteran overclockers will be right at home with the many buttons and
levers to tweak in the firmware. As memory manufacturers begin to push DDR4 speeds higher, the increased XMP profile support of up to 3333 MHz will be something you’ll be glad to have. LED illuminated heatsink and I/O shield is an icing on the cake and my favorite eye logo is back so I'm all the way more impressed.
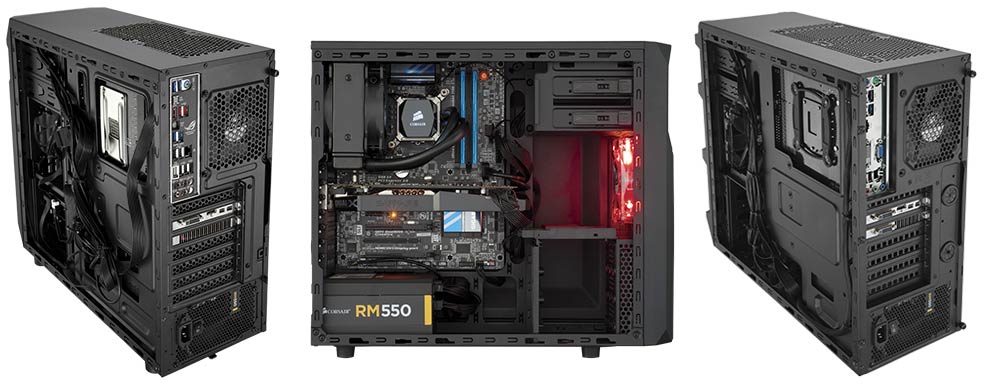
Corsair is a brand that is synonym to the word performance in the PC hardware industry especially if you consider its long range of AIO CPU Liquid Coolers from the Hydro Series. The cabinets are no less and to complete its global domination they came up with the Corsair Carbide 100R which I had the pleasure of reviewing a few months back. Today I have yet another Corsair product with me and this time its the more aggressive looking cousin of the 100R, the Corsair Carbide SPEC-02.
The SPEC-02 is Corsair's attempt to cater to those who want a cool looking cabinet with all the bling intact without throwing away a load of cash.
The Corsair SPEC-02 certainly looks impressive for its price tag of around $70. So before I jump to any conclusions lets take a quick looks at the specifications of this beauty:
All of that sure sounds interesting and quite promising for sure.
In my methodical manner we'll start the review in the following way so you can skip to any portion you deem fit for your preferences just in case you don't want to read the whole review.
The Packing
Inside and Out the Carbide SPEC 02
Testing: Load tests and Noise Levels
To Buy or not to buy?
The Packing
The Corsair Carbide SPEC 02 comes in a standard cardboard box packing kept in vertical face up position in contrast to the standing horizontal position that most of the cases come in. This is a move made by Corsair to reduce the price of the cabinet to a bare minimum by reducing the cost of cardboard used but is wisely compensated by Styrofoam blocks that are on either sides of the packaging.
The Styrofoam is thin, but this case is not heavy so there is plenty of shock value to this packaging. The case is actually really lightweight so this amount of foam is plenty for the Corsair Carbide SPEC-02. Its small but very compacted Styrofoam that is really tough to break.
I received mine in a no damage no broke condition so I'll say that the packing can withstand any kind of ordeal during transit that are quite common in India. So I'd consider it as a welcome move by Corsair to keep the money concentrated on the main module and not wasting it on fancy packaging by keeping it simple and efficient.
Also it includes a standard manual for the cabinet, a warranty card and four zip ties along with ample of screws for your radiators, fans, SSDs etc.
Inside and Out the Carbide SPEC 02
Inside: Much more than Expected
On the inside the Carbide SPEC 02 is black coated and has ample of space with a rear 120mm exhaust fan pre-installed along with mounting space for two 120mm fans or a 240mm radiator liquid cooling setup on top. In the front just behind the fascia plate we have the options for two 120mm or two 140mm fan mounts. It comes with a red LED 120mm fan pre-installed in the front which gives the SPEC 02 its signature red Hades like look on the front. For storage Corsair has given two cages for 5.25' optical drives and a cage for installing three 3.5' storage drives along with two for using 2.5' drives.
The SPEC 02 can support a maximum of ATX form factor motherboards anything above that will not fit inside at all. The PSU mount has a dust filter installed underneath to keep the insides clean and dust free. The filter can be pulled out even when the cabinet is upright and running. Also there are no rubber grommets on the slots and cavities but that doesn't make the cabinet look ugly or leaves any sharp edges, this not only a sign of good cost cutting but also shows that Corsair managed to pull up a decent design control system on this cabinet to give the user a balanced feel.
On removing the rear panel we see that the wire management options are good enough and can support a decent build inside. The removable motherboard back plate is present to ease the user in changing cooling kit brackets as per the need without pulling out the whole motherboard out. For proper wire management its adviceable that you use ribbon cables as you have around 10mm of clearance from the back-plate and thanks to the convex shape you can squeeze in another quarter inch or so of clearance for routing and bundling your wires.The Graphics Card clearance is virtually infinite as you can fit any graphics card available in the market today but the second GPU has a limit of about 280mm or 11 inches which means that big graphic cards like the Sapphire R9 270X Toxic or the Gigabyte GTX 970 G1 gaming edition will not fit inside for a dual CrossfireX or SLI configuration.
Its worth mentioning that if you use air coolers for your CPU then you'll have around 150mm of clearance which can be stretched upto 155mm thanks to the convex side panel. Pros:
Ample of space for a decent configuration.
Looks elegant and clean with good customization options.
Can support powerful cards in SLI/CrossFireX configuration.
Cons:
The CPU power cable routing hole is a bit misplaced.
HDD/SSD cages are a bit flimsy.
No clearance for you to remove a fan connector or RAM modules once a radiator is placed on the top mounts.
Exterior: Spacious and Dust free!
At only 493x215x426mm the SPEC-02 is only a little bigger than a few of the mid tower cases we've looked at recently. It also has a full size acrylic window on the left. The window is mounted into a slightly raised area of the case side to mimic the bulge on the right side of the case, thus maintaining the symmetry of the design.
The upper front is made of plastic with a matte black finish housing two 5.25' drive bays hidden by flat and smooth removable panels which blend into the front I/O panel on top that consists of 1xUSB2, 1xUSB3 and the usual Audio sockets. The power and reset buttons are of the short throw type, giving a nice click when pressed. Along with the HDD activity Light, there is also a slim LED strip running across the bottom of the I/O area.
The front fascia has been carved into thick plastic grills that not only give the Corsair SPEC 02 a very aggressive look along with its red LED illuminated fan on the inside but also provides plenty of ventilation to the components resting inside. At the back of this fascia you'll find a non removable layer of dust filter like mesh which in couple with the front grills manage to stop most of the dust. You can easily remove the whole front panel and dust it clean occasionally.
Round the back there's a pre-installed 120mm fan. Corsair have also included a generous seven expansion slots with vented covers. These are removed via external screws pretty much same as the Carbide 100R design. We're guessing it's little things like this that help keep the costs down. There's also a PSU aperture able to accept standard ATX PSUs.
The top has provision for dual 120mm fans or a 240mm radiator mount with a spacing of 15mm. These are not only fully covered by removable dust filters but also are off set by 35mm to provide maximum clearance to the motherboard heatsink and CPU power cord while mounting a radiator. At the bottom the SPEC 02 rests on four plastic feet that are sturdy and give enough clearance for the PSU and another 120mm fan to breath in cool air. This entire facility is yet again covered by another removable dust filter which is more than what one can expect! Pros:
Looks aggressive making it ideal for gaming builds.
Build quality is good.
Transparent side window is big enough but still hides the PSU.
Dust filters on top and bottom.
Cons:
Front fascia doesn't have a proper dust filter.
Bottom feet don't have a rubber padding leaving room for vibrations.
Testing: Load tests and Noise Levels
For the load tests I manged to fit in the following components inside the Corsair SPEC 02. The build came out to be really clean and roomy. CPU: AMD FX-6300 3.5GHz CPU Cooler: Corsair H60 liquid cooler Motherboard: Gigabyte GA-990FXA-UD3 Memory: Corsair Vengeance 8GB (2 x 4GB) Storage: Samsung 840 EVO 250GB 2.5" SSD Storage: Western Digital Caviar Blue 1TB Video Card: EVGA GeForce GTX 660 2GB Case: Corsair SPEC-02 ATX Mid Tower Power Supply: Corsair CS 750M 750W
Also I kept installed the pre-supplied rear 120mm fan on top as exhaust and kept the front LED fan intact. You can obviously install another 120mm fan as intake on the bottom and one in the front for better air flow. I did manage to mount a 140mm H90 and even a 280mm H110 liquid cooler on the front but that required me to remove the HDD cage completely leaving me with no space to mount my HDD/SSD. This is a noticeable feature as you can do this if you have a 5.25' adapter to convert a 5.25' bay into a combined 3.5' and 2.5' drive bay.
I tested the Carbide SPEC-02 for temperature and noise levels by keeping the CPU at stock frequency and the RAM overclocked at 2133Mhz, running Prime95 64 bit to stress the CPU and MSI Kombustor to stress the graphics card for half and hour and then measuring the temperatures using HW Monitor and Core Temp.
As you can see the Corsair Carbide SPEC 02 performs well and is causing no bottleneck in the cooling of either the H60 or any of the other components installed. The ventilation is optimum and impressive.
The acoustics of the case are well near the silent range due to its well build quality that eliminates any vibrations. The ample of dust filters provided also reduce the noise levels substantially.
To Buy or not to buy?
Well it appears this particular Corsair not only has sails but cannon
also, as it's blown everything else in the price range clean out of the
water, and scared of a few of the bigger vessels to boot. Basically if
you've only got $80 or Rs. 5000 to spend on a case you'd be nuts to buy anything
else. With a sturdy build quality, cable management options, ample of dust filters and room for accommodating any CLC cooler in the market today, obviously with a little presence of mind, the SPEC 02 is the case to go for.
The Corsair SPEC-02 is perfect for the home builder who's starting out on a budget and wants functionality, features and quality as well as a well-known, well regarded name on the front, but can't afford the pay the earth for it, preferring instead to focus his hard earned wedge on the components within.
I give it a 9.5/10