


Many a times we end up with a damaged or dis-functional optical drive on the PC rendering us helpless if the OS becomes corrupt and needs a formatting. Not to worry a bootable USB or Pendrive can help you in installing Windows 7 or Windows Vista in no time.
 In many cases your PC doesn't even start to give you a chance to make one but wait if you have a Mac OS then also you can make a bootable Pendrive or USB of Windows! Yes thats correct its possible, just follow this guide step by step to help you out of any such problem.
NOTE: To do so, your flash drive must have at least 4 GB of space, and you'll need the valid product key that came with your Windows 7 software. You can create a bootable flash drive on either a Windows or Mac OS X computer.
Warning: The process in the steps below will delete any data currently on the flash drive. Before continuing, be sure to backup your flash drive's data by copying it to another flash drive, your computer, or an external hard drive.
1-Create or Obtain a Windows 7 ISO:
- Install a free burning program. There are a number of free burning utilities available online like Nero or Alcohol. You need one that can create ISO files. If you received your Windows 7 as a downloadable ISO file from Microsoft, you can skip to the next section or You can download legal
.isofiles for Windows 7 from Digital River, in both 32-bit and 64-bit versions. Be sure to download the bit version that matches that of the Windows 7 disk where you obtained your product key. - Insert your Windows 7 DVD. Open your new burning program. Look for an option such as “Copy to Image” or “Create Image.” If prompted, select your DVD drive as the source.
- Save your ISO file. Choose an easy to remember name and location for the file. The ISO you make will be equal in size to the disc you are copying. This means it can take up several gigabytes of space on your hard drive. Be sure you have enough storage available.
Using Free Software
- From the Microsoft Store, download and install the Windows 7 USB/DVD Download Tool.
- From the
Startmenu, open theWindows 7 USB/DVD Download Tool Setup Wizard. - When prompted, browse to your
.isofile, select it, and clickNext. - When asked to select the media type for your backup, make sure
your flash drive is plugged in, and then choose
USB
device
. - You'll likely be prompted to insert the USB device even if the flash drive is already inserted. Ignore this, and simply choose the USB device you'll be writing to.
- Click
Begin Copying. If prompted, confirm that you wish to erase the flash disk. - The
.isofiles will start copying to the flash drive (the process can take several minutes). When finished, close the wizard and eject and remove the flash drive.
Using Command Line
- Plug-in your Flash Drive. First plug-in your USB stick to your USB port and copy all the content to a safe location in your hard drive .
- Run Command Prompt as an administrator. To open a command prompt, go to the Start menu and search for CMD. Right-click on it and select Run as Administrator to use it with admin rights.
- Using the Diskpart utility find the drive number of your flash drive. To do so, type in the following command in the command prompt: DISKPART.
- Running DISKPART will display the version of DISKPART you are running and the name of your PC.
- Type “list disk” to see a display of all your connected disk drives. Make a note of the number assigned to your Flash drive.
- Format the drive. Execute the following list of commands one-by-one. Make sure you replace Disk 1 with the proper Disk number from DISKPART. For example Over here my Pendrive is Disk 3 you may replace it with the digit that represents yours. Just keep typing the following commands in the given order
select disk 3
clean
create partition primary
select partition 1
active
format fs=NTFS QUICK
assign
exit
- Make the flash drive bootable. Use the bootsect utility that is shipped with Windows 7/Vista. To do so follow the steps below.
- Insert the Windows 7/Vista DVD and note down the drive letter of the DVD drive. For this guide, the DVD drive is I: and the USB drive is K:.
- Navigate to the directory where bootsect is found.
i:
cd i:\boot - Use the bootsect to make the USB Drive bootable. This updated the
drive with BOOTMGR compatible code and prepares it to boot Windows
7/Vista.

BOOTSECT.EXE/NT60 k: - Close the Command Prompt windows.
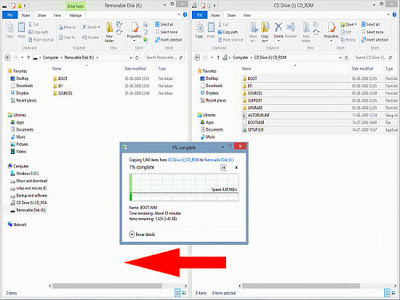
- Copy all files from the Windows 7/Vista DVD to the formatted USB stick. The safest and the fastest way would be to use the Windows Explorer. Open the disk, select everything, and drag it into your flash drive. This could take a few minutes to copy.

Creating Using a Mac OSX
Note: In Mac OS X, the option to create a Windows 7 flash drive will only appear if the computer you're using does not have an optical drive. On Macs with optical drives, the option will be either missing or grayed out.In Mac OS X, to create a bootable Windows 7 flash drive:
- From the Finder, open the
Applicationsfolder, and thenUtilities. - Open the
Boot Camp Assistant, and then clickContinue. The next screen should give you a list of options. - I recommend making the USB drive installer first. You can skip the actual Windows install and downloading the support software at this time, as it will be easier to do both later. To proceed:
- Verify that the USB drive you will be writing to is plugged in.
- Uncheck the
Install Windows 7andDownload the latest Windows support software from Appleoptions. - Check
Create a Windows 7 install diskand clickContinue.
- Your USB drive should be listed in the "Destination disk" area.
Use the
choosebutton to browse to your.isofile; after selecting it, clickContinue. If prompted, confirm your action and/or provide an administrator's password. The process of writing the.isofile to the USB drive can take twenty minutes or longer.
So that is all that I knew and had to share, if you have any other method please feel free to inform me. As always any query is welcome.


0 comments:
Post a Comment