


So you've just got yourself a shiny new SSD to replace your HDD as storage for your OS for fater booting aswell as faster execution of any application. Or you might have well got a new HDD/SSD to replace your old dusty storage drive.
But the big problem is of reinstalling the whole Windows and all the applications including your work softwares to your big game setups that resided peacefully in your by default "C:" partition. Its obviously very tedious to do all that again but wait I'm here to solve this problem and save your precious time so that you can simply plug and play your new hardware.
 The easiest solution to this is to Clone your primary hard disk and that also your system partition onto your new drive before starting to use it. Cloning copies the complete contents
of one drive—the files, the partition tables and the master boot
record—to another: a simple, direct duplicate. Imaging copies all of
that to a single, very large file on another drive. Simply speaking your computer will feel as if its the same old drive even tough its the new and faster drive that you just bought.
The easiest solution to this is to Clone your primary hard disk and that also your system partition onto your new drive before starting to use it. Cloning copies the complete contents
of one drive—the files, the partition tables and the master boot
record—to another: a simple, direct duplicate. Imaging copies all of
that to a single, very large file on another drive. Simply speaking your computer will feel as if its the same old drive even tough its the new and faster drive that you just bought.
For cloning we need to have a third party software to aid us in this process, there are plenty of them out there and most of them are free and most reliable as-well. Today I'll use Macrium Reflect as its compatible with all the brand's drive regardless of the company or type.
Note: Before you attempt to clone your hard drive or SSD, we highly recommend backing up all your data first. In addition, make sure the drive you are cloning to has enough storage space to take all the cloned data. For instance, you wouldn't want to try and clone a 2TB HDD on to a 256GB SSD now would you?

Now boot up your system and proceed to the next step.
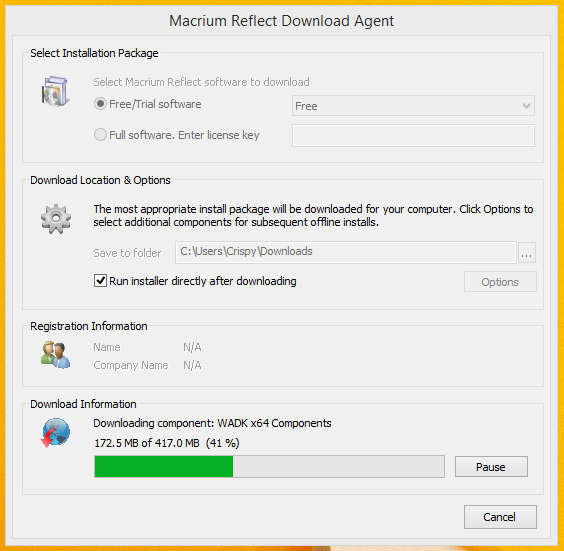
Download and install the software on your system.
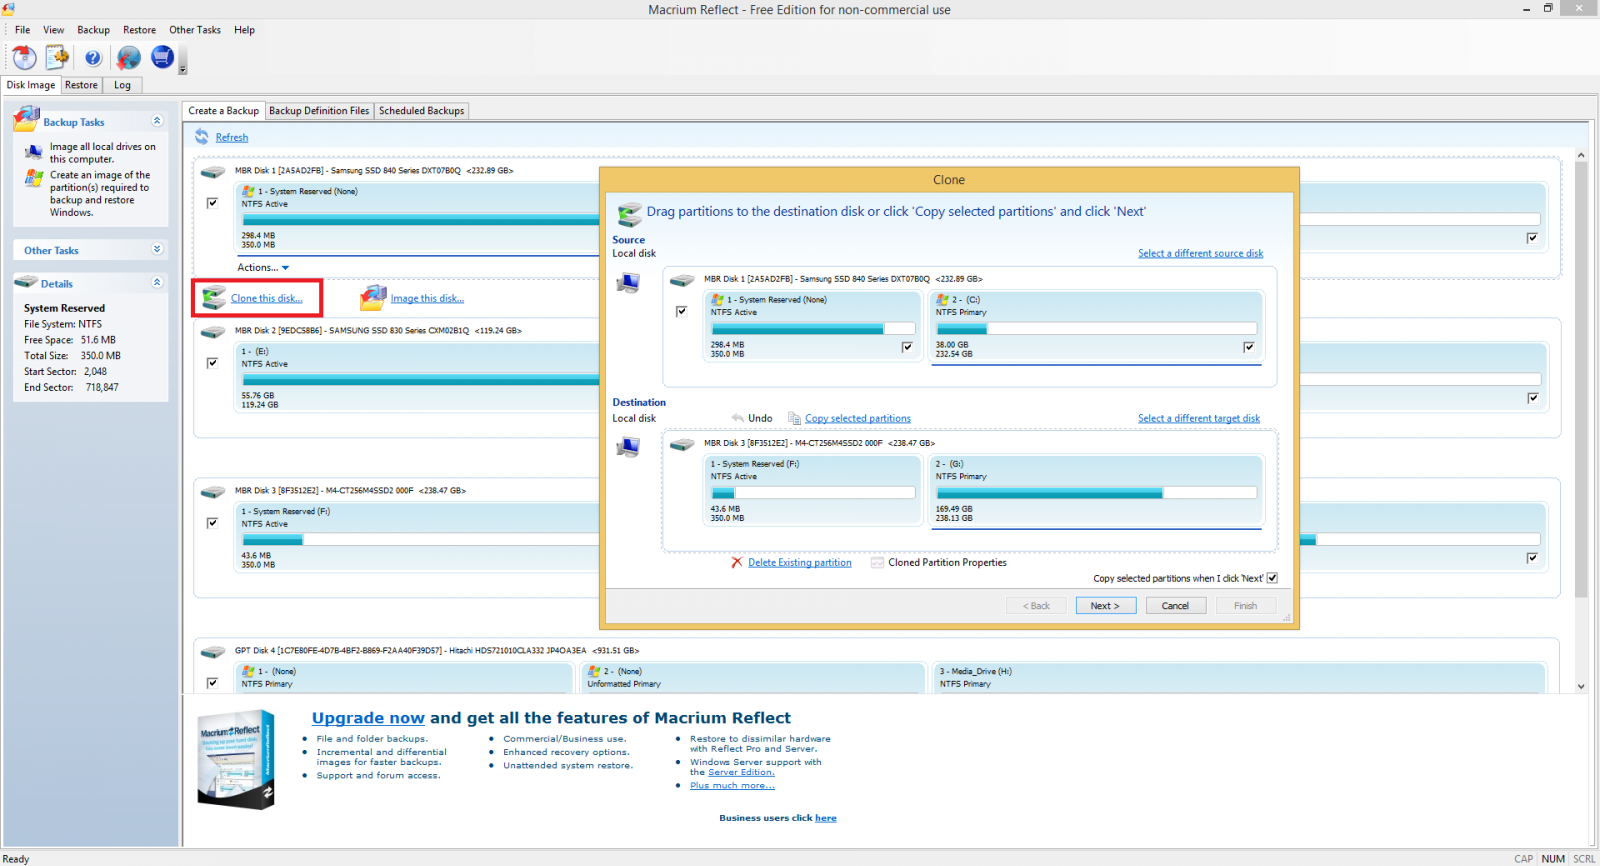 Open up the software and click on Clone this disk…after this you'll see the option of choosing the source drive and the destination drive, the source drive is the drive that you want to clone preferably the windows partition and the destination drive will be your new drive that you plugged in. Make sure that you choose both the drives correctly and cross check it once selected as you might end up copying the wrong partition or in worst case a blank drive onto the system partition!
Once you have double checked that you have selected the correct destination disk, click “Copy selected partitions.” Macrium will ask if you wish to perform a “forensic” or “intelligent” sector copy. “Forensic” will copy every single bit on the hard disk, regardless of whether or not it’s actually in a used sector. “Intelligent” will only copy the disk sectors actually in use. We recommend you select the intelligent sector copy and tick “Verify File System.”

Click OK and you'll see the drive being cloned and that's it. It will take time depending on how much data you are cloning, ranging from minutes to hours. So go around and make yourself a cup of coffee in the mean time.

There you can click the “Maximum Size” button to automatically resize the existing partition to utilize the full amount of available disk space.

Much better! We didn’t spend all that money upgrading to a nice spacious SSD to leave the partition unexpanded. At this point, with your disk cloned and your partition expanded, it’s time to test out the new drive.
Now when the Windows boot up simply you can go to My Computer and see that all your files are copied and working from the new storage, now you are free to format the old partition on your old disk and free up that space.
Well that was all I guess you got your data cloned and your system running at a much faster pace than before and yes you definitely saved up a lot of time and hassle.
If you have any query regarding the same or want to add something to the article feel free to drop a comment.
But the big problem is of reinstalling the whole Windows and all the applications including your work softwares to your big game setups that resided peacefully in your by default "C:" partition. Its obviously very tedious to do all that again but wait I'm here to solve this problem and save your precious time so that you can simply plug and play your new hardware.

For cloning we need to have a third party software to aid us in this process, there are plenty of them out there and most of them are free and most reliable as-well. Today I'll use Macrium Reflect as its compatible with all the brand's drive regardless of the company or type.
Note: Before you attempt to clone your hard drive or SSD, we highly recommend backing up all your data first. In addition, make sure the drive you are cloning to has enough storage space to take all the cloned data. For instance, you wouldn't want to try and clone a 2TB HDD on to a 256GB SSD now would you?
Step1: Plug it in
Before we do anything you need to plug your new HDD or SSD into your PC either via the USB port if you have the adapter and cable or you can connect it simply as a slave disk along with your existing drive through the SATA connector.
Now boot up your system and proceed to the next step.
Step2: Download and install Macrium Reflect
Macrium Reflect is available hereDownload and install the software on your system.

Step3: Important and Sensitive
 Open up the software and click on Clone this disk…after this you'll see the option of choosing the source drive and the destination drive, the source drive is the drive that you want to clone preferably the windows partition and the destination drive will be your new drive that you plugged in. Make sure that you choose both the drives correctly and cross check it once selected as you might end up copying the wrong partition or in worst case a blank drive onto the system partition!
Once you have double checked that you have selected the correct destination disk, click “Copy selected partitions.” Macrium will ask if you wish to perform a “forensic” or “intelligent” sector copy. “Forensic” will copy every single bit on the hard disk, regardless of whether or not it’s actually in a used sector. “Intelligent” will only copy the disk sectors actually in use. We recommend you select the intelligent sector copy and tick “Verify File System.”

Click OK and you'll see the drive being cloned and that's it. It will take time depending on how much data you are cloning, ranging from minutes to hours. So go around and make yourself a cup of coffee in the mean time.
Step4: Finishing touches
When you’re done, there’s one thing you’ll likely notice immediately: the partition copied in a 1-to-1 ratio to the new disk which means if you’re upgrading from a 120GB SSD to a 512GB SSD there will be a whole lot of unused space. Don’t worry, we can fix that easily enough. Simply click on the “Cloned Partition Properties” beneath your freshly cloned disk.
There you can click the “Maximum Size” button to automatically resize the existing partition to utilize the full amount of available disk space.

Much better! We didn’t spend all that money upgrading to a nice spacious SSD to leave the partition unexpanded. At this point, with your disk cloned and your partition expanded, it’s time to test out the new drive.
Step5: Reboot
After the cloning process is over just restart your PC and press F8 on your BIOS screen to enter the boot menu and change the boot priority to the new HDD or SSD that you've just cloned all your data to. This will make it your primary drive for booting up and make the old storage as a slave drive.Now when the Windows boot up simply you can go to My Computer and see that all your files are copied and working from the new storage, now you are free to format the old partition on your old disk and free up that space.
Well that was all I guess you got your data cloned and your system running at a much faster pace than before and yes you definitely saved up a lot of time and hassle.
If you have any query regarding the same or want to add something to the article feel free to drop a comment.


.JPG)


0 comments:
Post a Comment